Italiando

Tartufini di panettone

Inevitably, as springtime stirs and I reach deep into the pantry, clearing the last of the winter stockpile, I come across a poor abandoned panettone that survived Christmas, having never been unveiled as part of a December feast or found the arms of a friend as a holiday gift.

Panettone, a festive cake studded with raisins and candied fruit, is basically shorthand for Christmas, gracing every Italian table during the holiday season. Many legends celebrate its origin – a nobleman in disguise who invented the cake to save the village baker from ruin and woo his daughter; a scullery boy named Toni who whipped up the original using ingredients he scrounged together when the court chef burned dessert (hence “pane di Toni” or “Tony’s bread”); a nun who baked the cake in the shape of a cupola for her fellow Sisters – all with the common denominator of yuletide symbolism. But panettone’s other trademark is an impressive shelf life – about 6 months, thanks primarily to the long process of fermentation in which the yeast is given the chance to rise twice.

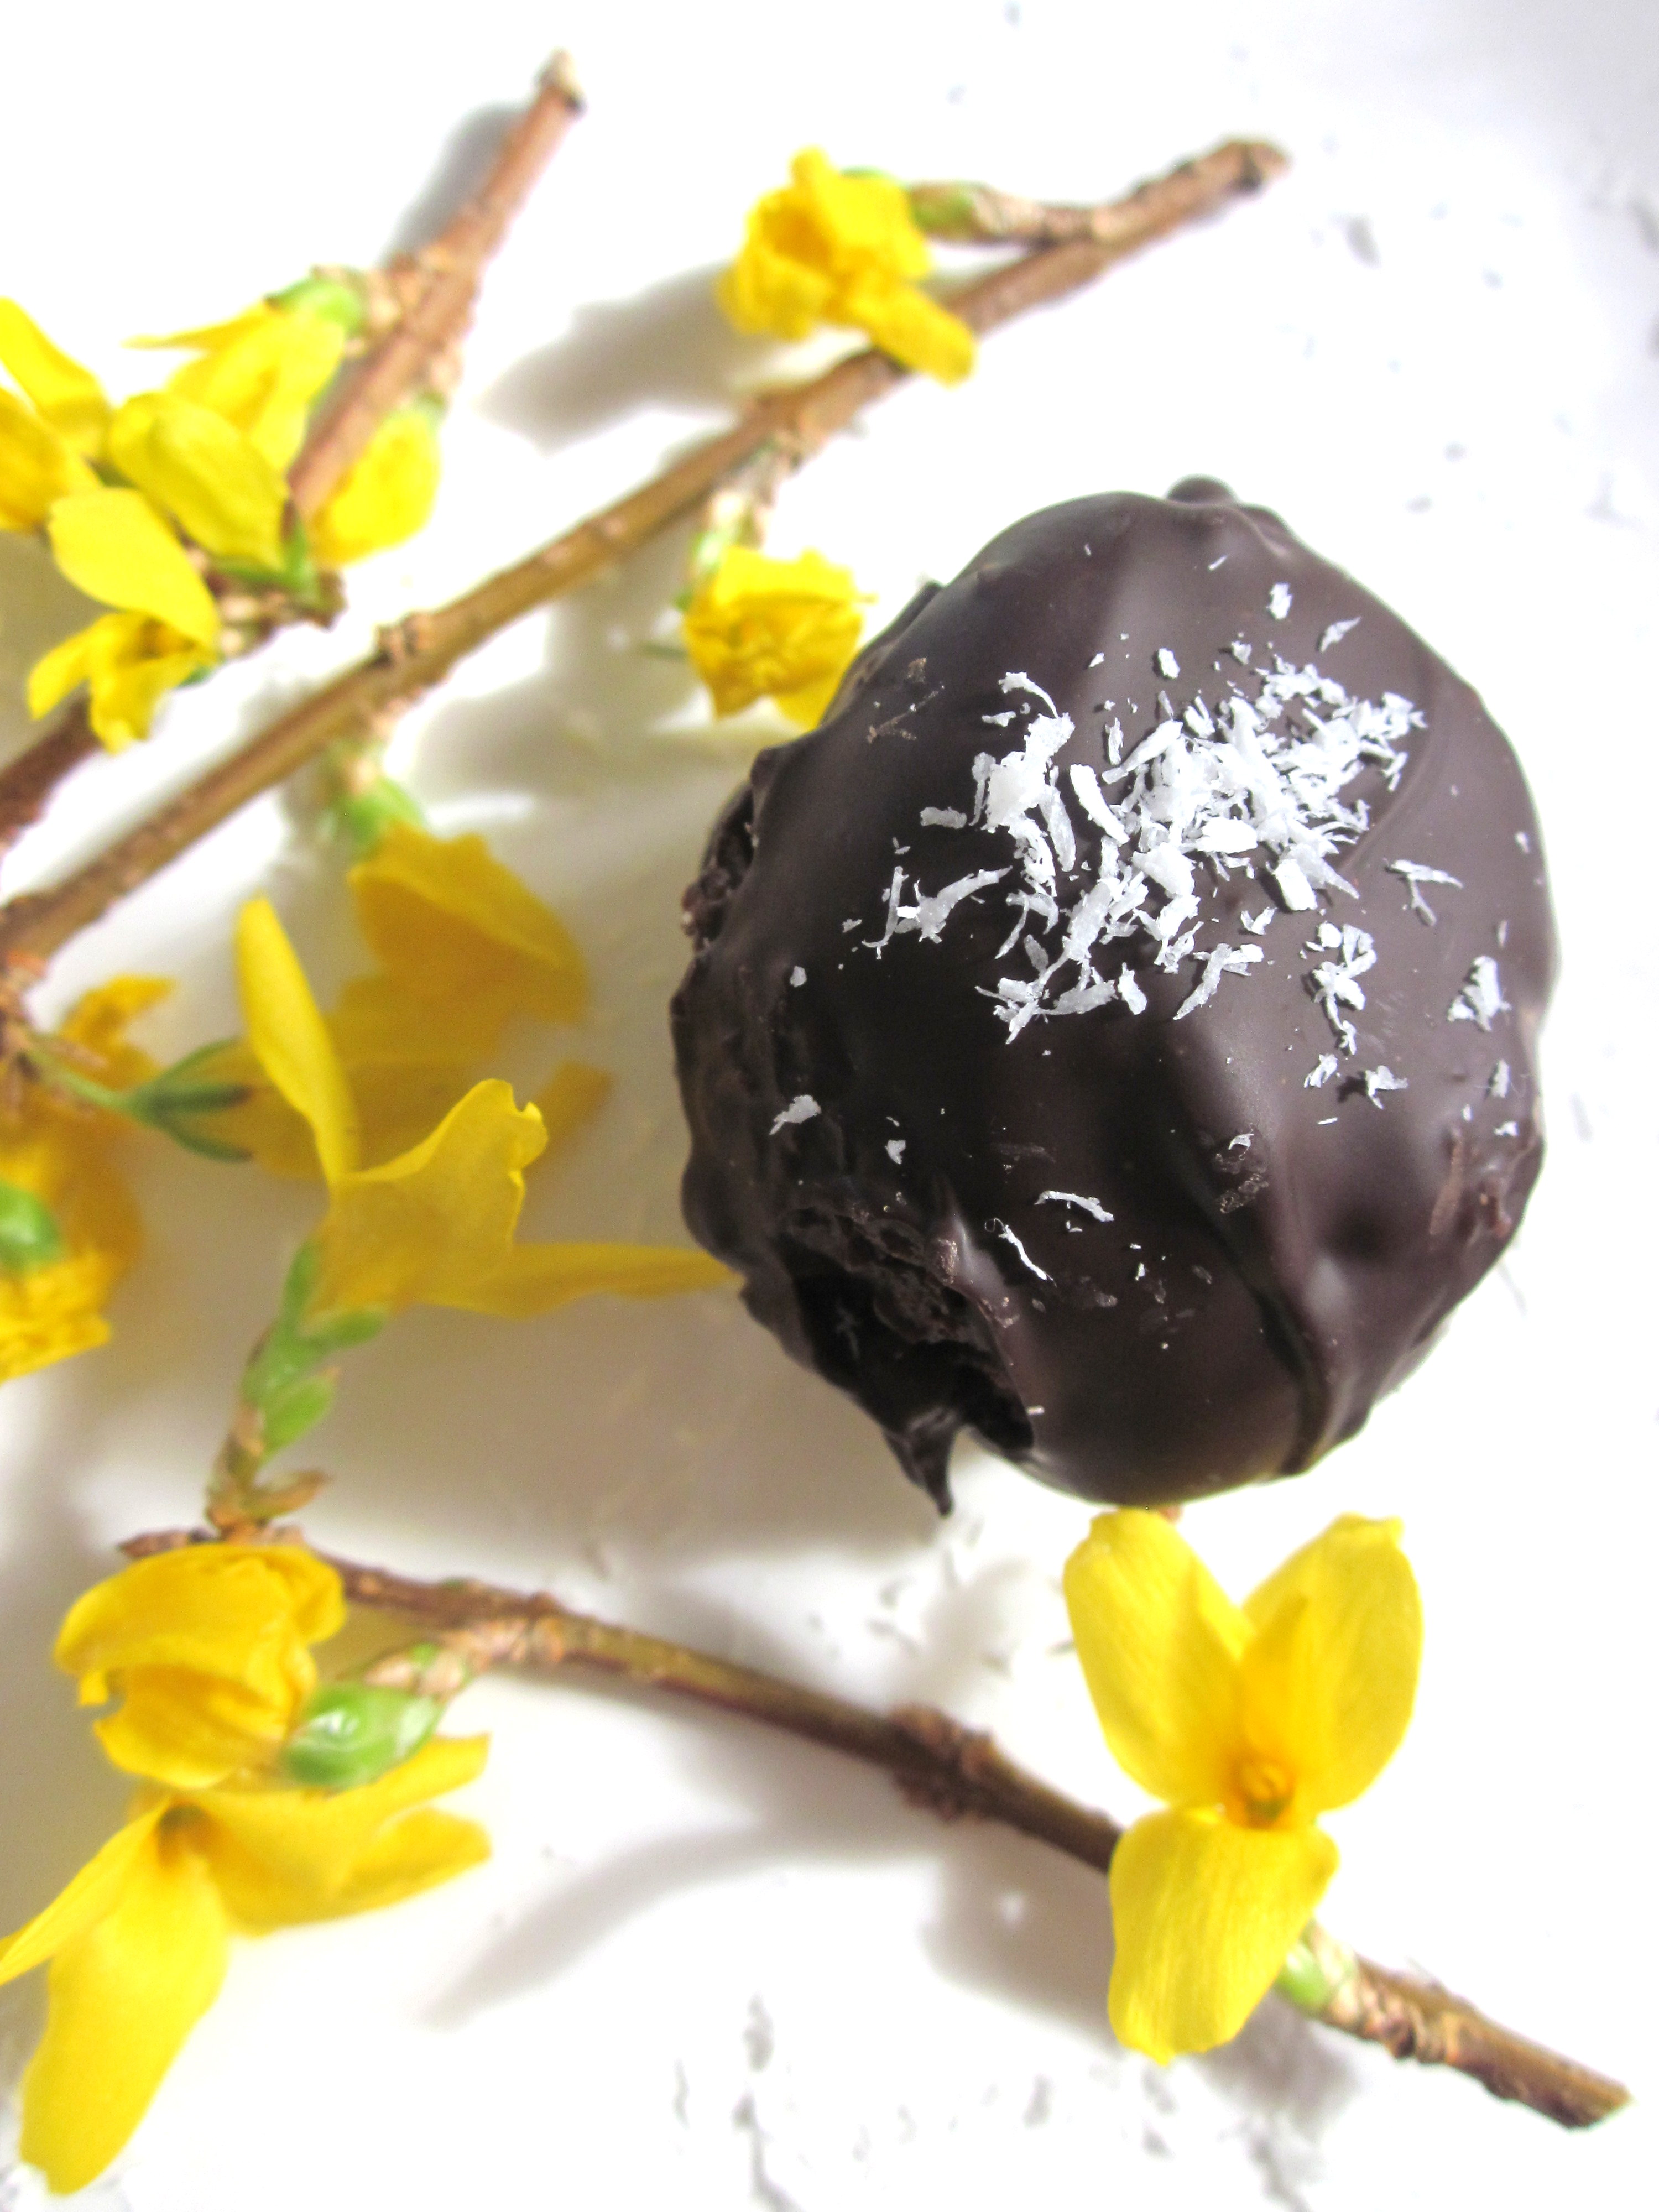
Part of me cringes at the thought of panettone well into March, like Christmas decorations that hang on too long after all the snow has melted and crocuses pierce through the ground, but I’m not one to cast aside perfectly good cake. And, lo, panettone truffles were born. Soaked in rum, mixed with toasted hazelnuts, and coated in dark chocolate, they are barely recognizable as that Christmas fruitcake with a sometimes stodgy reputation.

A note on the recipe: To melt the chocolate for the truffle coating, it is helpful to use a double broiler, or a bain-marie, which is a stovetop setup that allows you to heat ingredients gradually, without burning. I get by with an improvised system that I rig up with whatever I come across in the kitchen. Find a heatproof bowl that sits comfortably on a small or medium pot, making sure that the bottom of the bowl is at least several inches above the bottom of the pot. Add a small amount of water to the base – roughly an inch, never too much that the bowl comes into contact with the water. Bring the water to a boil, then reduce to a simmer before you heat any ingredients in the top bowl. It’s well worth the small extra effort to melt the chocolate this way; you’ll achieve a more pleasant taste and smoother texture than you would by microwaving the chocolate or heating it directly in a pan.

IMG_0823

Tartufini di panettone
Adapted from La Repubblica – La Cucina di D

Makes about 40 truffles – they freeze well.

1 panettone
1 cup milk
½ cup rum
¾ cup sugar
½ cup grated coconut, plus extra for garnish
3 tablespoons cacao powder
3 tablespoons hazelnuts, toasted and chopped
3 cups dark chocolate, chopped into small chunks

IMG_0788

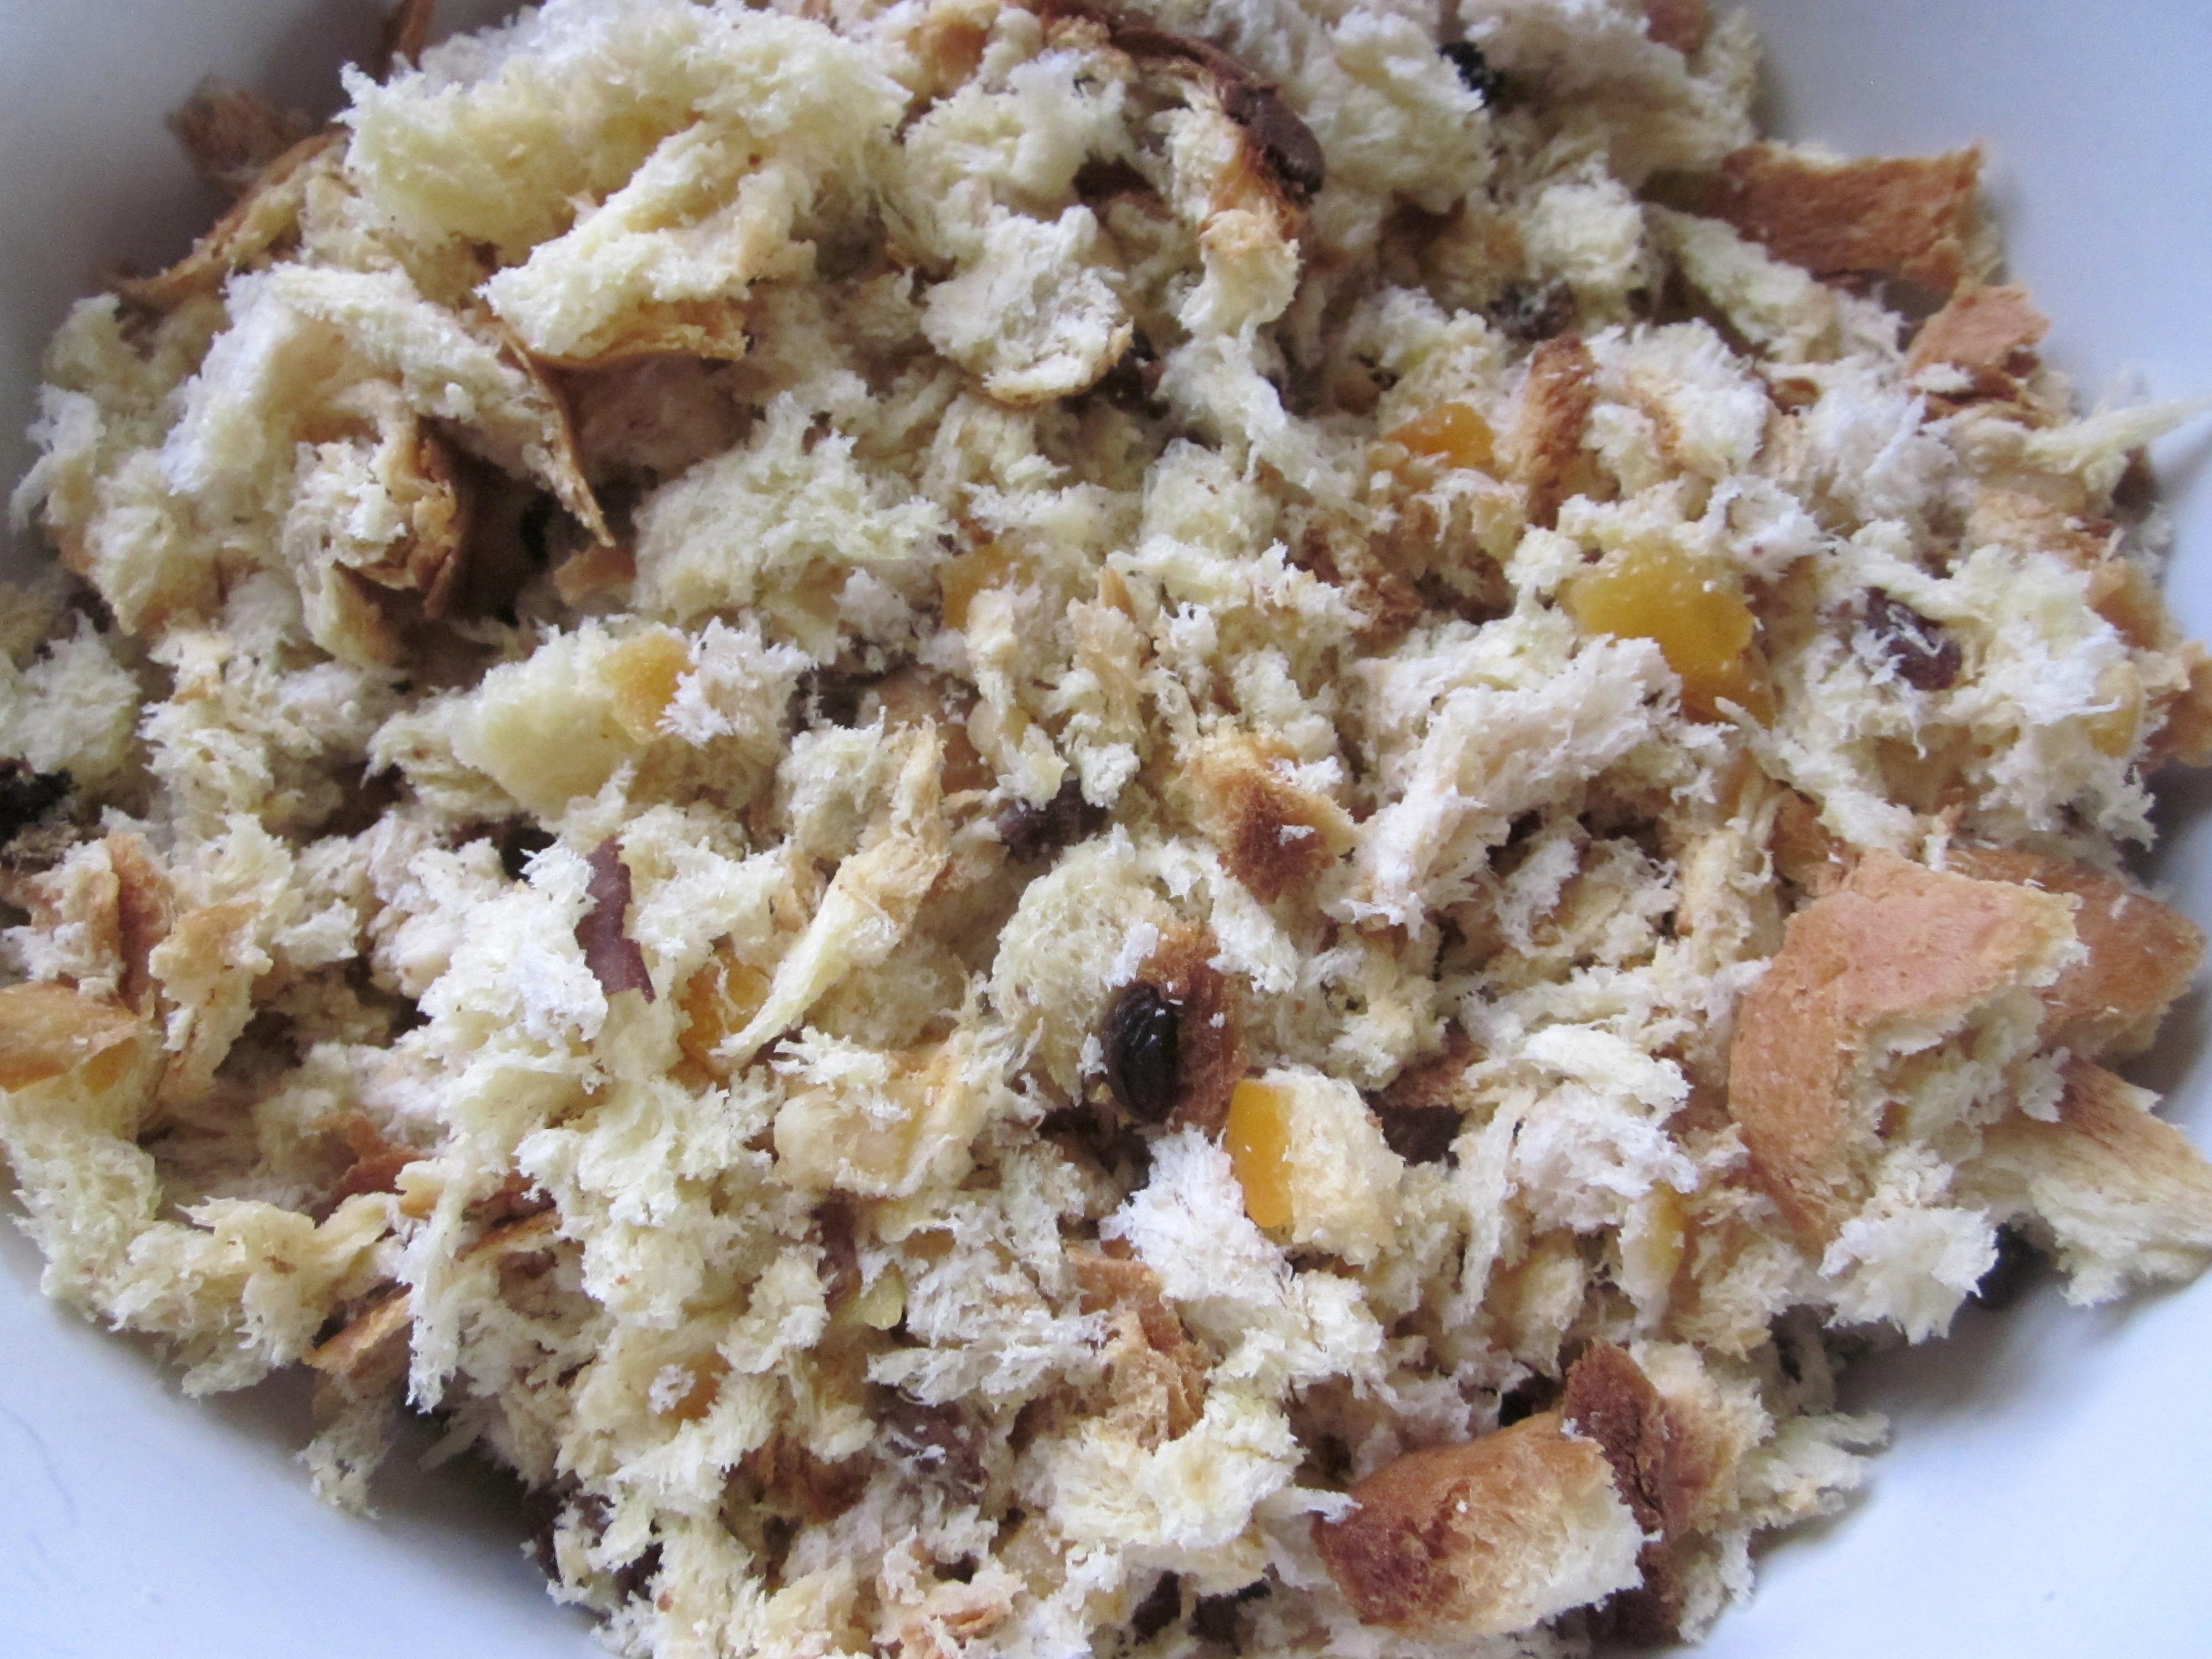
1. Shred the panettone into small pieces and place in a large mixing bowl.

IMG_0791

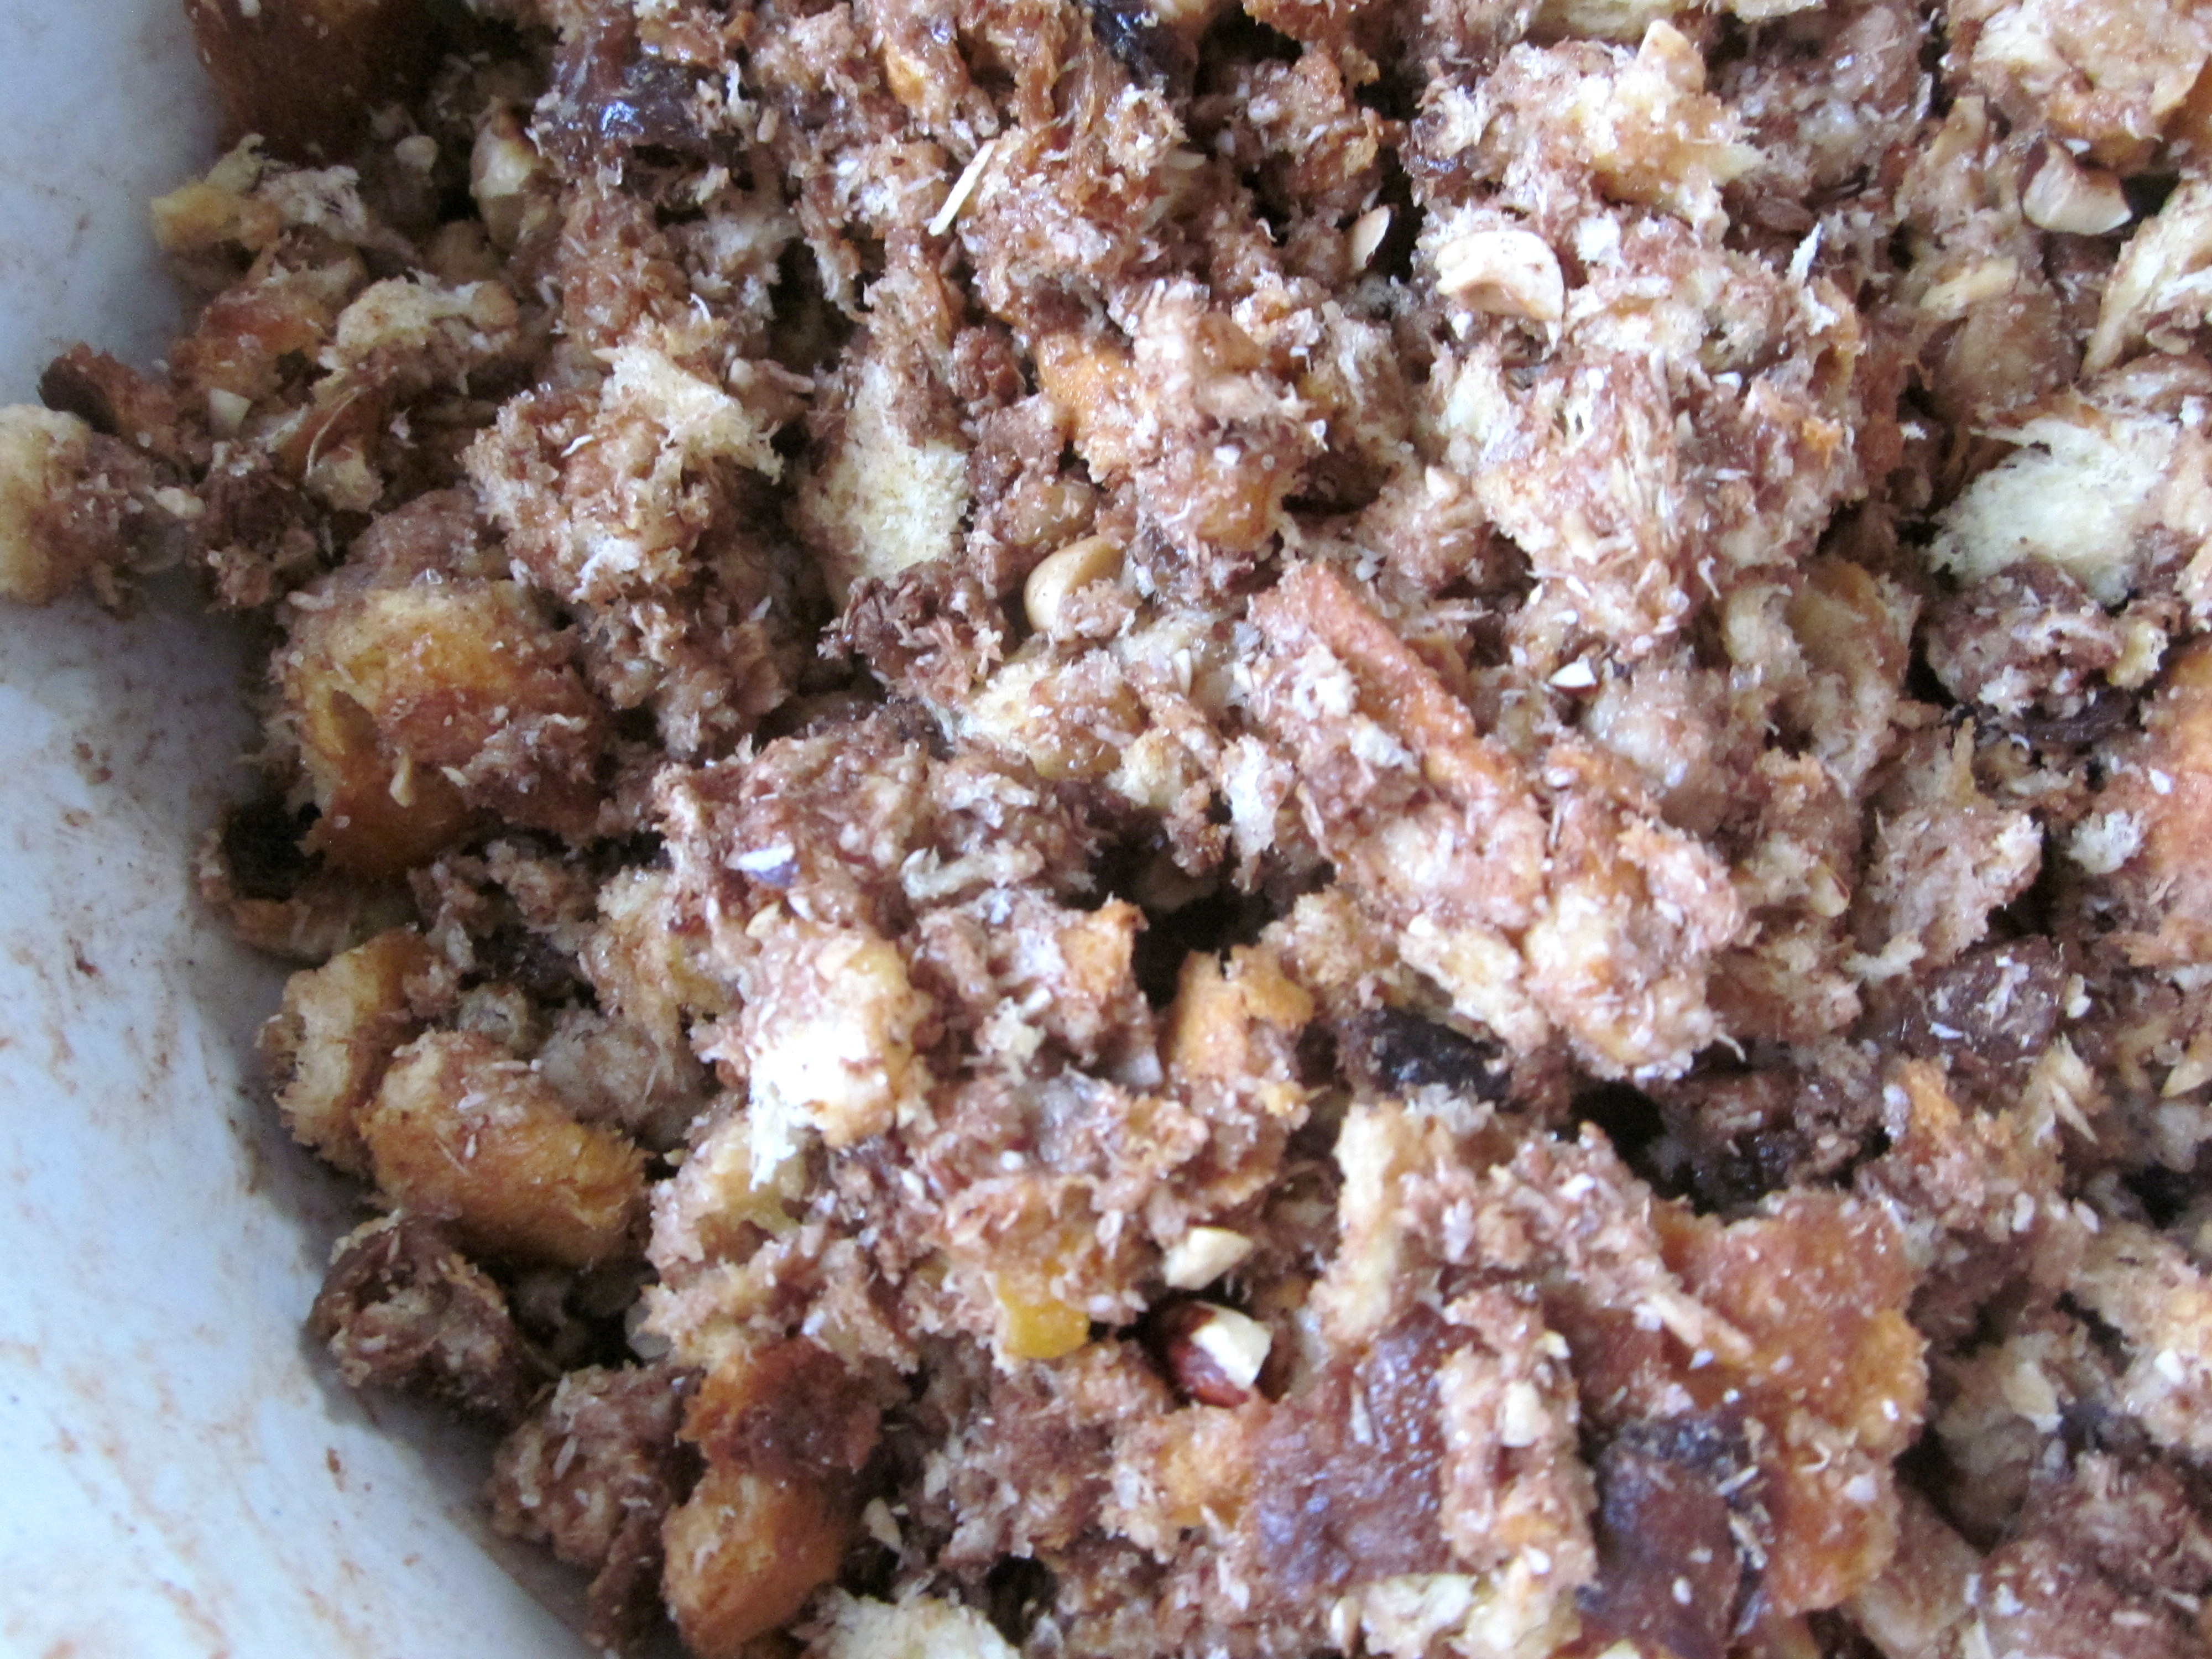
2. Add the milk, rum, sugar, grated coconut, cacao powder, and hazelnuts. Stir well; you should notice the mixture begin to stick together, forming a cohesive mass. Cover and chill in the refrigerator for about 2 hours.

IMG_0820

3. Take the panettone mix out of the fridge. Working with a generous spoonful of mix at a time, roll the batter into small balls with the palms of your hands, and place on a baking sheet lined with parchment paper. Cover the baking sheet and stick in the freezer for another hour.

IMG_0865

4. When the truffles near the end of their time in the freezer, begin melting the dark chocolate with a double broiler. Once the water boils, turn down the heat and add the chocolate pieces. Use a spatula to stir the chocolate, ensuring it melts evenly. If you find the chocolate is too thick, add a little bit of vegetable oil or butter, but not water, which will instead make it clumpy.

IMG_0869

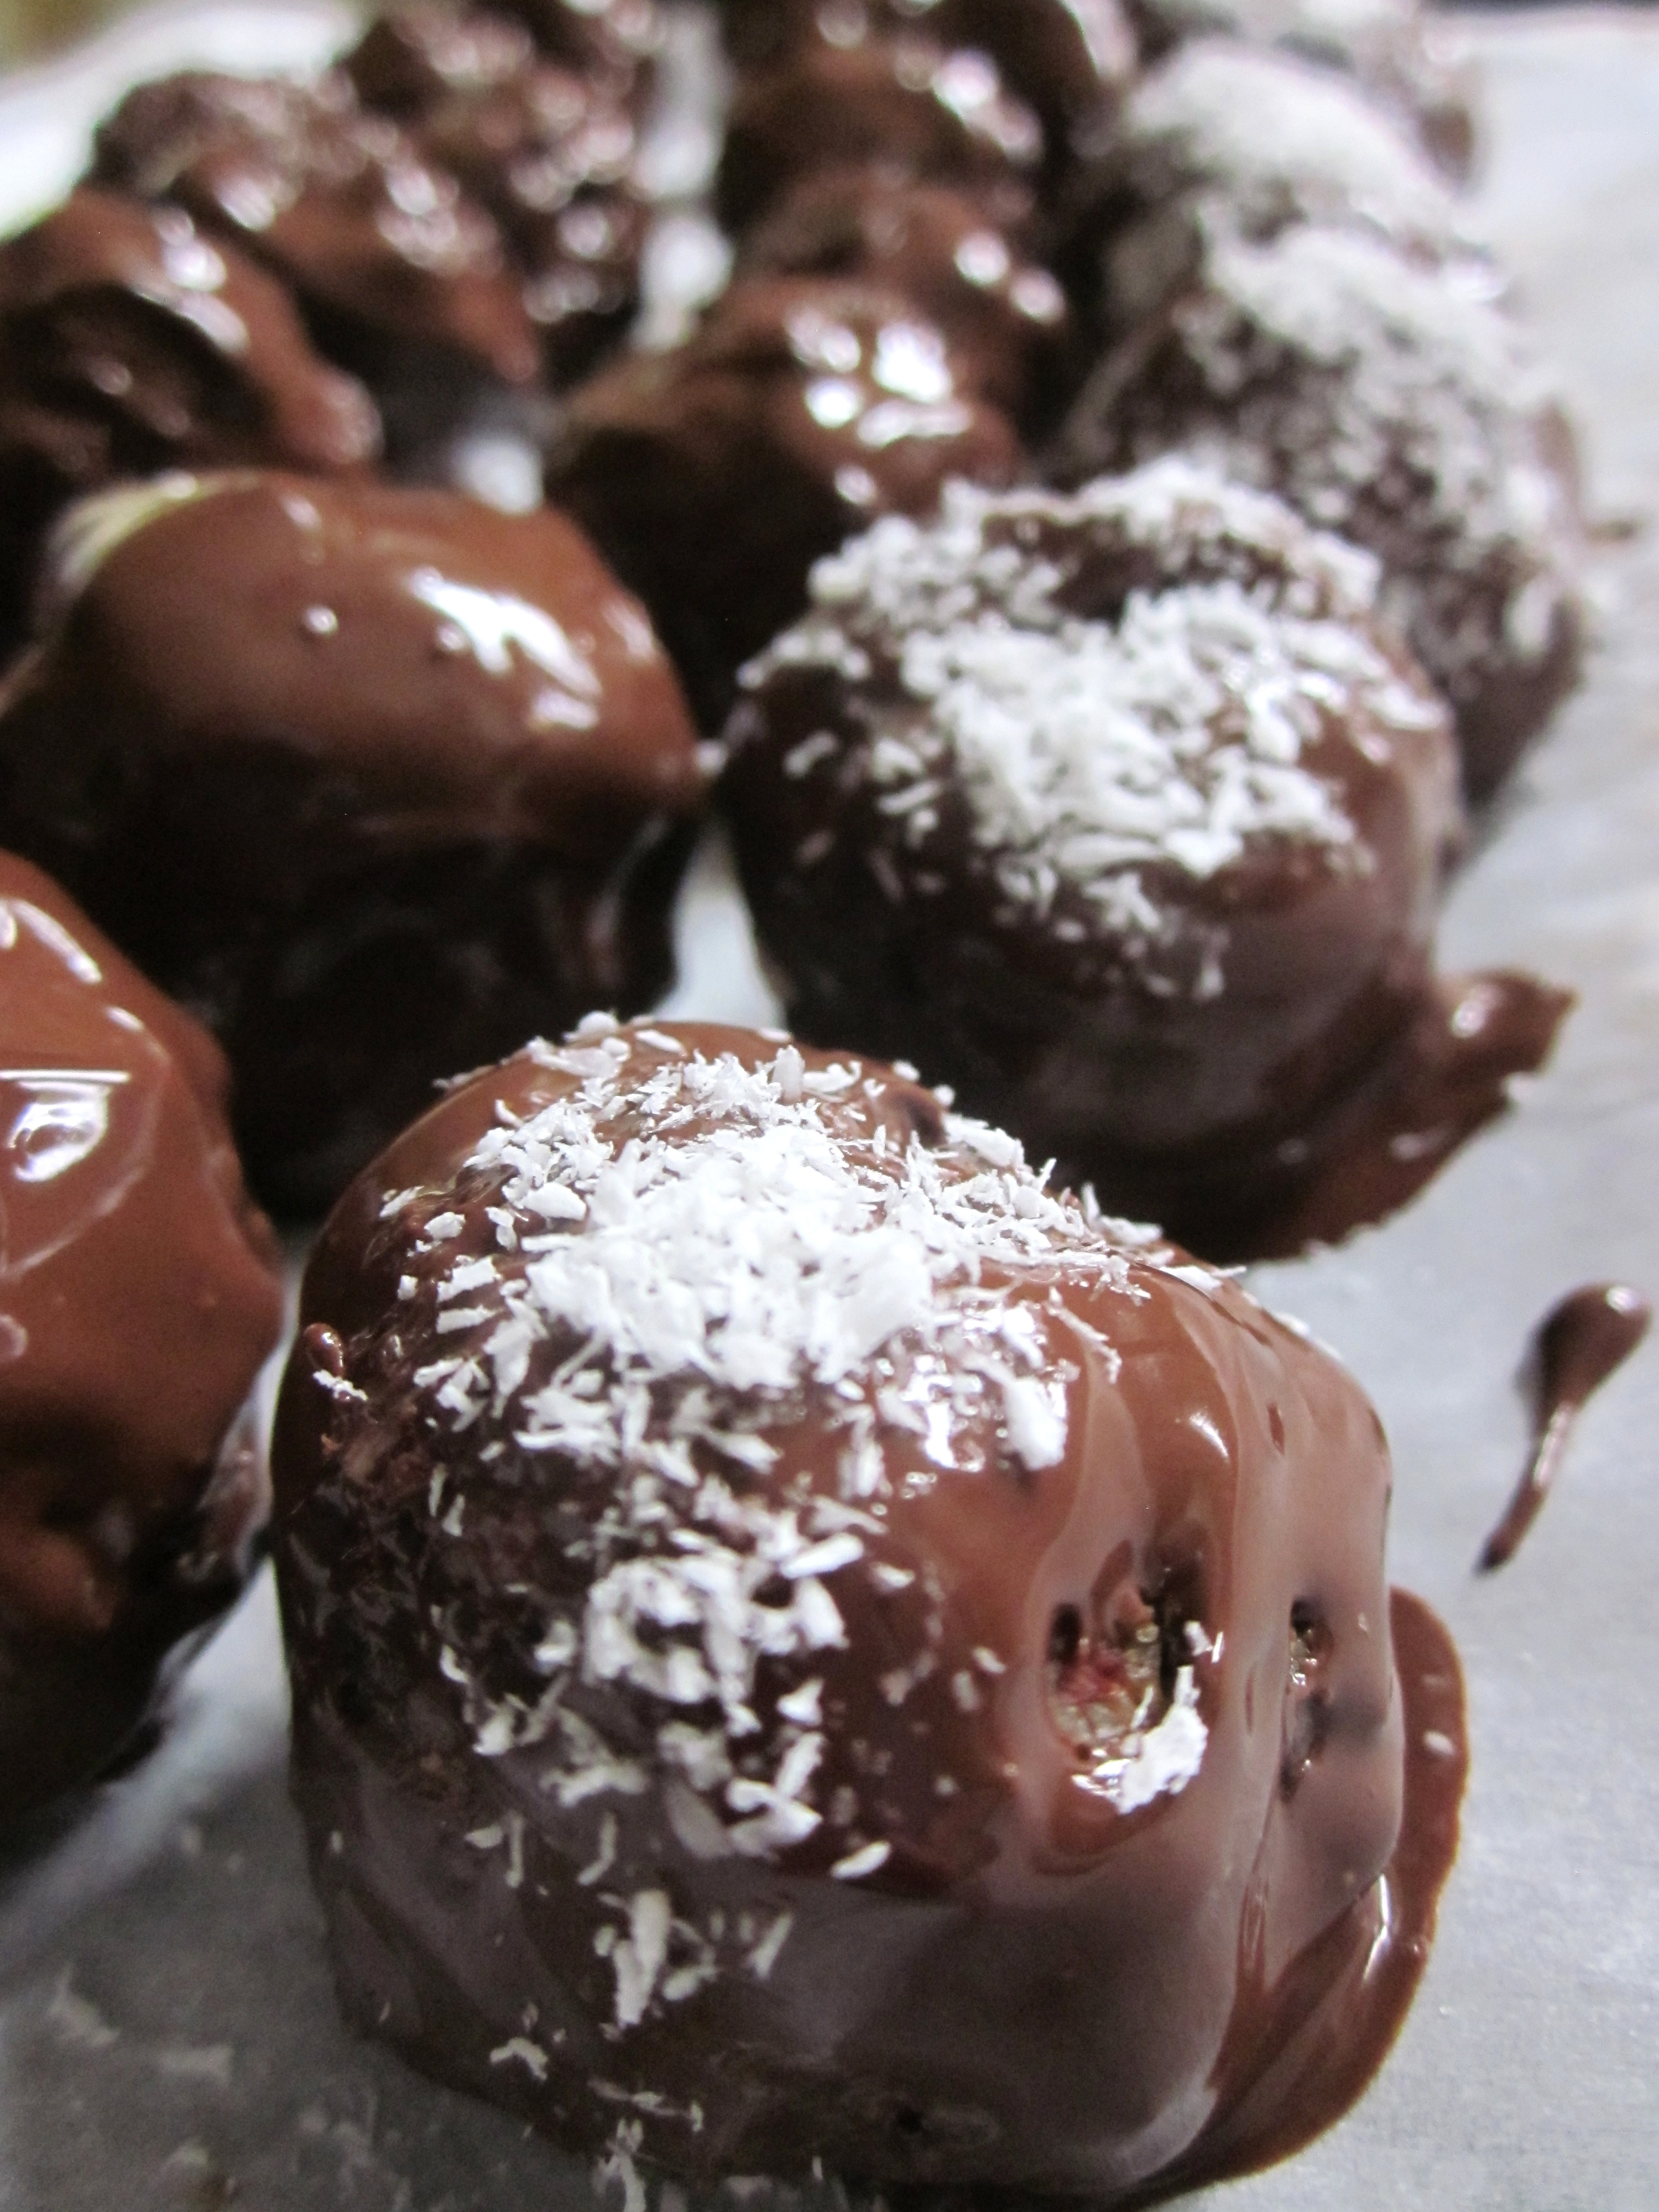
5. As soon as the chocolate attains a smooth, viscous consistency, turn off the heat. Drop the truffles in the bowl one by one, tossing them around so they become fully coated with chocolate, and return them to the same cookie sheet. Here, your greatest challenge is to avoid getting fingerprints all over the truffles to guarantee a smooth chocolate exterior (using the tip of a fork or even plastic gloves to transfer them helps), though you can also go for a more rustic effect.

6. In a final flourish celebrating your achievement as a new master chocolatier, sprinkle grated coconut on the truffles.

7. Loosely cover the baking sheet and place it in the freezer for about 30 minutes to allow the chocolate to harden, or let sit in a cool spot for a few hours.

IMG_0830


Standard
Taste Trekking

Gumbo z’herbes

With gumbo, you do watcha wanna; trying to pin down an exact recipe is like searching for gators in bayou swamp water. The mention of gumbo might conjure up thoughts of shrimp, chicken, and andouille sausage, but the beauty of the catch-all stew is that there are infinite ways to make it your own based on your mood or whatever is fresh or on hand that day. Creole seafood gumbos often include crab or oysters, while versions from Cajun country make use of venison, squirrel, and alligator. And then there’s gumbo z’herbes, a venerable sub-category of its own within the gumbo family.

Like the majority of gumbos, gumbo z’herbes uses the “holy trinity” (onion, bell pepper, and celery) as its foundation and Cajun seasoning as its primary spice. However, as its name – a shortened form of gumbo des herbes – suggests, its main ingredient is a hodgepodge of greens. According to Louisiana lore, every green you add to the gumbo signifies a new friend you’ll make that year. This past week, I used collards, mustard greens, curly kale, Lacinato kale, and dandelion greens, but you can use whatever combination of leafy greens you like – spinach, chard, turnip greens, chicory, beet greens, carrot tops, cabbage, sorrel, parsley… Gumbo z’herbes is a kale smoothie I can handle.

IMG_9127IMG_1008IMG_9031

There are as many different histories and meanings attached to gumbo as there are recipe interpretations. It’s generally agreed that gumbo z’herbes originated as a meal made during Lent. Traditionally, Catholics abstain from eating meat on Fridays in the 40-day period after Fat Tuesday, so some say the gumbo emerged as a meatless alternative that could feed families on these Friday evenings, especially on the main day of fasting, Good Friday.

For Leah Chase, chef and owner of the legendary New Orleans soul food institution Dooky Chase, gumbo z’herbes is eaten on Holy Thursday, the day before Good Friday. Her version has seven different kinds of greens matched by seven different kinds of meat, and is meant to fortify its eaters for the day of fasting to come. Others claim that nine types of greens should be used to symbolize the nine churches visited by Catholics in New Orleans as part of their traditional Good Friday pilgrimage. Regardless of the day or the exact number, everyone agrees that an odd number of greens should be used to signify good luck.

IMG_9171IMG_9151bIMG_1014

Gumbo achieves its trademark consistency through three different thickeners: okra, filé, or a roux. Cooked okra’s slimy texture may be off-putting to some, but it is actually a treasured binder between chopped vegetables and broth. Filé is a powdered form of sassafras leaves, a contribution made by the Choctaw Indians to Cajun cooking, and is added to gumbo to thicken the stew once it finishes cooking, shortly before serving. Roux, on the other hand, speaks to French culinary influence in Creole cooking. In this method of thickening soup, flour is slowly stirred into fat and cooked to either a light or dark brown color.

Gumbo z’herbes often calls for filé as its thickening agent. However, in the version of gumbo z’herbes below, which is a combination of different recipes I’ve come across, I make a roux for a base, then add okra for some variety in texture. I also add shrimp, since they liven things up while keeping everything Catholic-friendly. Happy Friday!

IMG_9140IMG_1028

Gumbo z’herbes
Serves 8

5 bunches of greens
1 green pepper
4 celery stalks
1 white or yellow onion
1 bunch green onion
1 clove garlic
1 pound okra (about 4 cups chopped)
1 – 1 ½ pounds medium sized shrimp
2 tablespoons butter or vegetable oil (I recently tried out olive oil to attempt a healthier version and was actually surprised to discover it works well)
2/3 cup flour
1 tablespoon Cajun seasoning (my personal favorite is Slap Ya Mama, but you can make your own with cayenne pepper, paprika, salt, oregano, and black pepper)
1 bay leaf
2 whole cloves
Generous pinch of allspice
Salt & pepper

  1. Wash greens, remove any tough stems, and tear into large pieces.
  2. Place the greens in a large pot with about 3 cups of water and some salt. Cook over medium-high heat until the water starts to simmer, stirring occasionally, then tightly cover with a lid. Turn down the heat and let cook for about 10-15 minutes. Depending on the size of your pot, you may want to divide the greens in two batches for this step, or add the greens to the pot in stages as they cook down.
  3. While the greens are cooking, start prepping your other vegetables: dice the green pepper, onion, and celery, mince the garlic, and chop the green onions and okra.
  4. Once the greens have cooked down, put a colander over a large bowl and drain them, reserving all the cooking liquid. Puree half of the greens in a food processor or blender. Chop the remaining half into small pieces and set aside.
  5. Make a roux: Heat oil or butter over a medium flame in the large pot. Gradually sprinkle in the flour while stirring continuously with a whisk, taking care to keep the roux from burning. Cook, constantly stirring, until the roux takes on a dark caramel color and smells nutty. If you’re not in a hurry and are looking for an arm workout, cook over low heat for about 45 minutes, armed with a beer in your other hand. If you’re pressed for time you can cheat by turning up the heat and cooking for about 15 minutes.
  6. Once your roux has browned, add the “holy trinity” (onion, celery, and green pepper) to the pot, together with the green onions and garlic. Cook over medium-high heat for about 5 minutes, stirring often. When the onion begins to turn translucent, add the okra and Cajun seasoning. Continue to cook, turning down the heat slightly, for 10 minutes or so, letting the vegetables brown.
  7. Add 3 cups of water and the reserved liquid from the greens to the pot, followed by the pureed and chopped greens. Turn up the heat and bring the gumbo almost to a boil. Add the bay leaf, cloves, and allspice, along with salt and pepper to taste, and stir well. Reduce the heat to a low simmer and let cook for about an hour or longer, stirring occasionally.
  8. When you are about ready to serve, add the shrimp and let cook 5-10 minutes.
  9. Serve the gumbo in a bowl over a bed of rice. For an extra spicy and vinegary kick, add some Green Tabasco.

While it simmers:

Songs celebrating NOLA and its food

Dave Bartholomew, Shrimp & Gumbo: http://www.youtube.com/watch?v=WxVcNYsKwLA

Dr. John, Mama Roux: http://www.youtube.com/watch?v=3n3CShvEWWs

Louis Armstrong, Struttin With Some Barbeque: http://www.youtube.com/watch?v=BSbRs2TjVKs

James Booker, Piano Salad (probably the only salad you’ll have in New Orleans, if you’re not counting Bloody Marys): http://www.youtube.com/watch?v=EUup6vXI6aE

Clifton Chenier, Jambalaya (On the Bayou):  http://www.youtube.com/watch?v=vfuOet2mDRM

Cousin Joe, Chicken a la Blues: http://www.youtube.com/watch?v=tCqbdgg8xd4

Professor Longhair, Red Beans: http://www.youtube.com/watch?v=5CMz9WX1pfI

Louis Jordan, Saturday Night Fish Fry: http://www.youtube.com/watch?v=jGiJ0bUzuaw

The Dirty Dozen Brass Band, I Ate Up The Apple Tree: http://www.youtube.com/watch?v=5qQuqjkRdGg

Standard
Italiando

Snow day braise

Days like these are made for slow-cooking…

IMG_0997IMG_0936IMG_0972IMG_0963IMG_0916IMG_1052IMG_0921IMG_1031

When I’m snowed in, one of the meals I crave most is the rabbit my grandpa would cook when I visited him in Piedmont during winter. The skillet of rabbit he would bring to the table may have looked humble compared to a whole roast chicken or slab of brisket, but it was full of flavor, tasting like the chestnuts the animal would feed on throughout the fall.

Arguably the most popular and widespread version of rabbit in Italian cooking is coniglio arrosto, which translates to “roasted rabbit.” Technically, the meat is braised rather than roasted, meaning it is initially seared over high heat, then simmered slowly with small amounts of liquid – a way of cooking meat that allows it to remain juicy as it develops an irresistibly caramelized skin.

Each region of Italy is associated with its own unique embellishments to coniglio arrosto, depending on the availability of specific seasonal ingredients and the characteristic foods produced within the area. In Liguria, for example, the meat is typically prepared with black olives, one of the main products of the coastal region. At the foothills of the Alps in Piedmont, where corn is plentiful, coniglio arrosto is often served alongside polenta or, in the spring months, lightly sautéed sweet peas. Regardless of the variations between different regional adaptations, coniglio arrosto, with its rustic informality, is an expression of the value of simplicity and making use of readily available ingredients.

My grandpa had grown up eating the coniglio arrosto cooked by his mother and raised in the farm where his family lived. The family recipe has been passed down not on a piece of paper, but through observation and practice, becoming more of an instinct than a formula. Here is how I’ve learned it, in approximations:

IMG_0991

Nonno Beppe’s coniglio arrosto

1 rabbit, cut into pieces (for those in the D.C. area, I found some Maryland-raised rabbit at Harvey’s butcher shop at Union Market)
1/2 cup dry white wine
3 tablespoons olive oil
2 sprigs fresh rosemary
2 cloves of garlic
Salt & pepper

1. Heat olive oil in a skillet with the garlic. Add the rabbit, seasoning the exposed side with salt and pepper. Sear over high heat for about 5 minutes, until browned. Turn, seasoning the other side, and cook for another 5 minutes or so. Depending on the size of your pan, you may want to sear the rabbit in two batches to avoid overcrowding the pan.

IMG_0979

2. Add white wine and rosemary sprigs, then cover the pan and simmer for 45 minutes to an hour. Once the wine has been absorbed, add about 1/4 cup water. Continue to check on the rabbit to see when the liquid has been absorbed, adding 1/4 cup at a time when the pan is dry.

IMG_0981

3. When the rabbit is almost done (fork-tender), continue cooking without the lid for about 10-15 minutes, until all the liquids are absorbed. On a snow day, serve with polenta.

IMG_0984

Standard